Every drawing on this page is built from shapes you already know: circles, ovals, triangles and a few curved lines. Each one takes four steps and about five minutes. Start at the top, where the drawings are simplest, and work your way down.
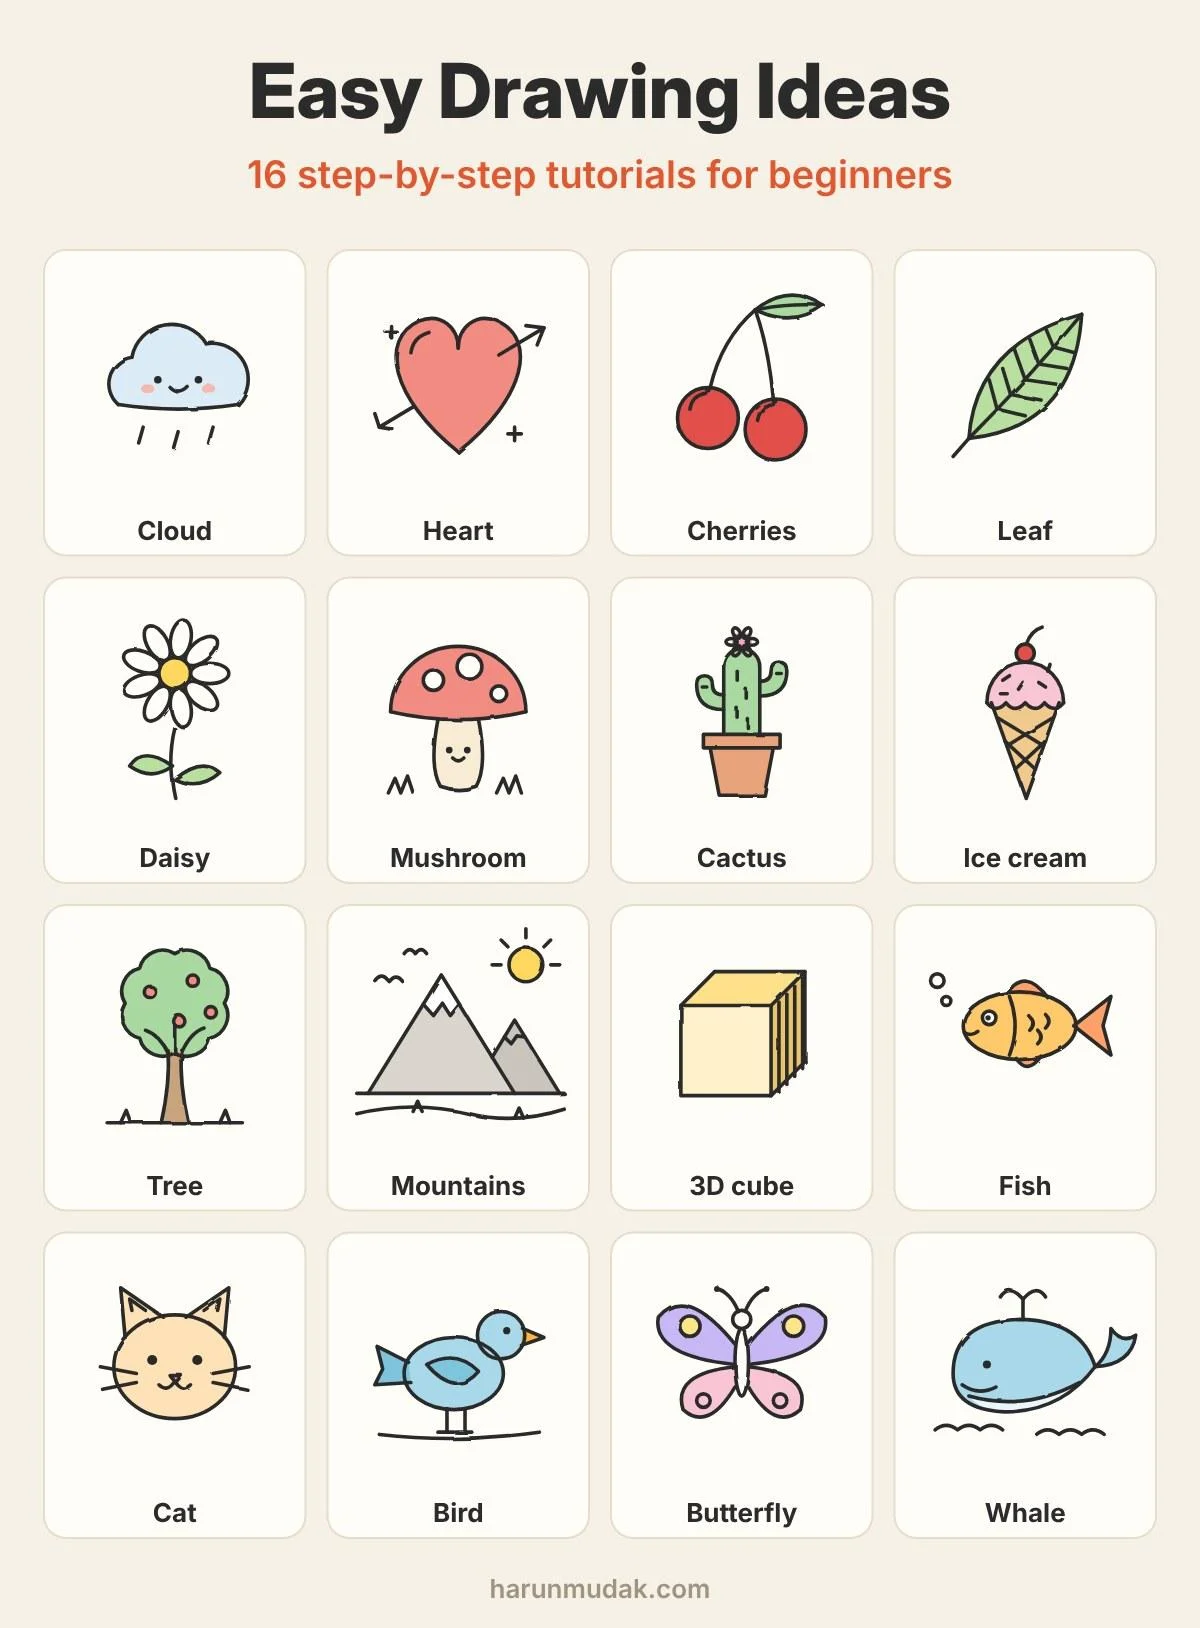
What you need
A pencil, an eraser and any paper will do. If you want to choose, an HB or 2B pencil is soft enough to erase cleanly, and a black fineliner makes the finished drawing look crisp. Colored pencils or markers are optional. If you are starting from nothing, a basic sketching set covers all of it: see drawing supplies on Amazon.
How to follow the steps
- Orange lines are new. In every picture, the lines you add in that step are orange. The black lines are the ones you have already drawn.
- Draw lightly first. Press softly so mistakes erase without a trace. Go over the lines more firmly once the shape looks right.
- Wobbly is fine. None of these drawings needs a perfect circle or a straight line. A slightly uneven line looks hand-drawn, which is the point.
- Color comes last. The fourth panel shows one way to color the drawing. Use whatever colors you like.
16 easy drawings, step by step
1. Cloud
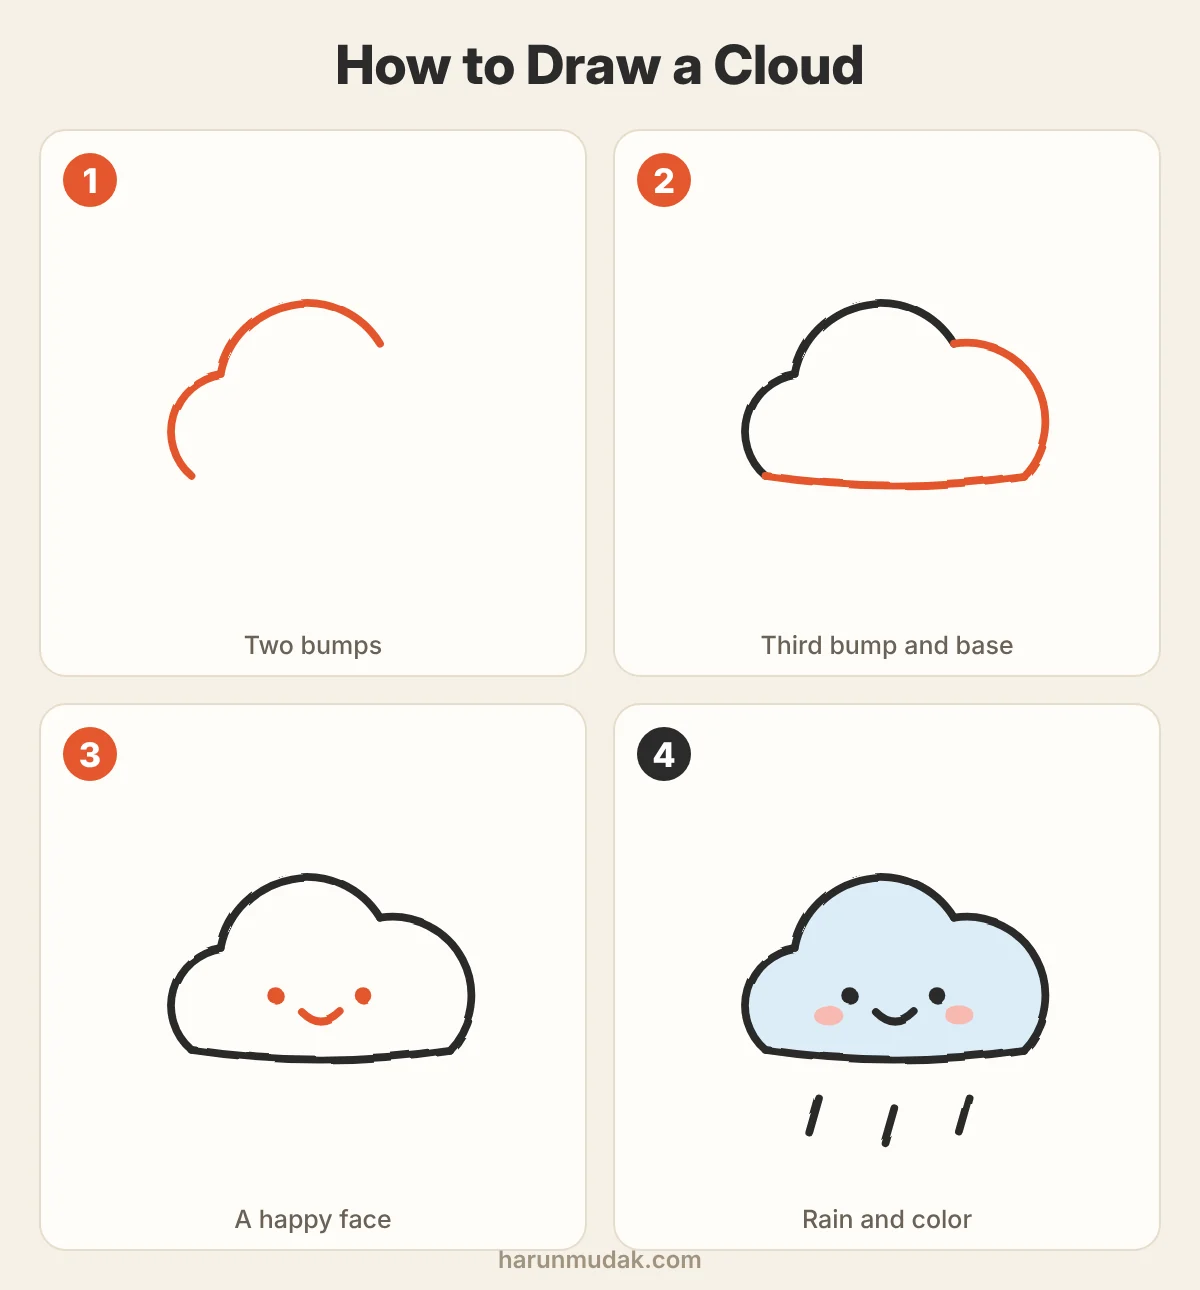
Draw a small bump and a bigger bump next to it, like two hills. Add a third bump on the right and close the bottom with a nearly flat line. Two dots and a short curve make the face. Three slanted dashes underneath turn it into a rain cloud.
2. Heart
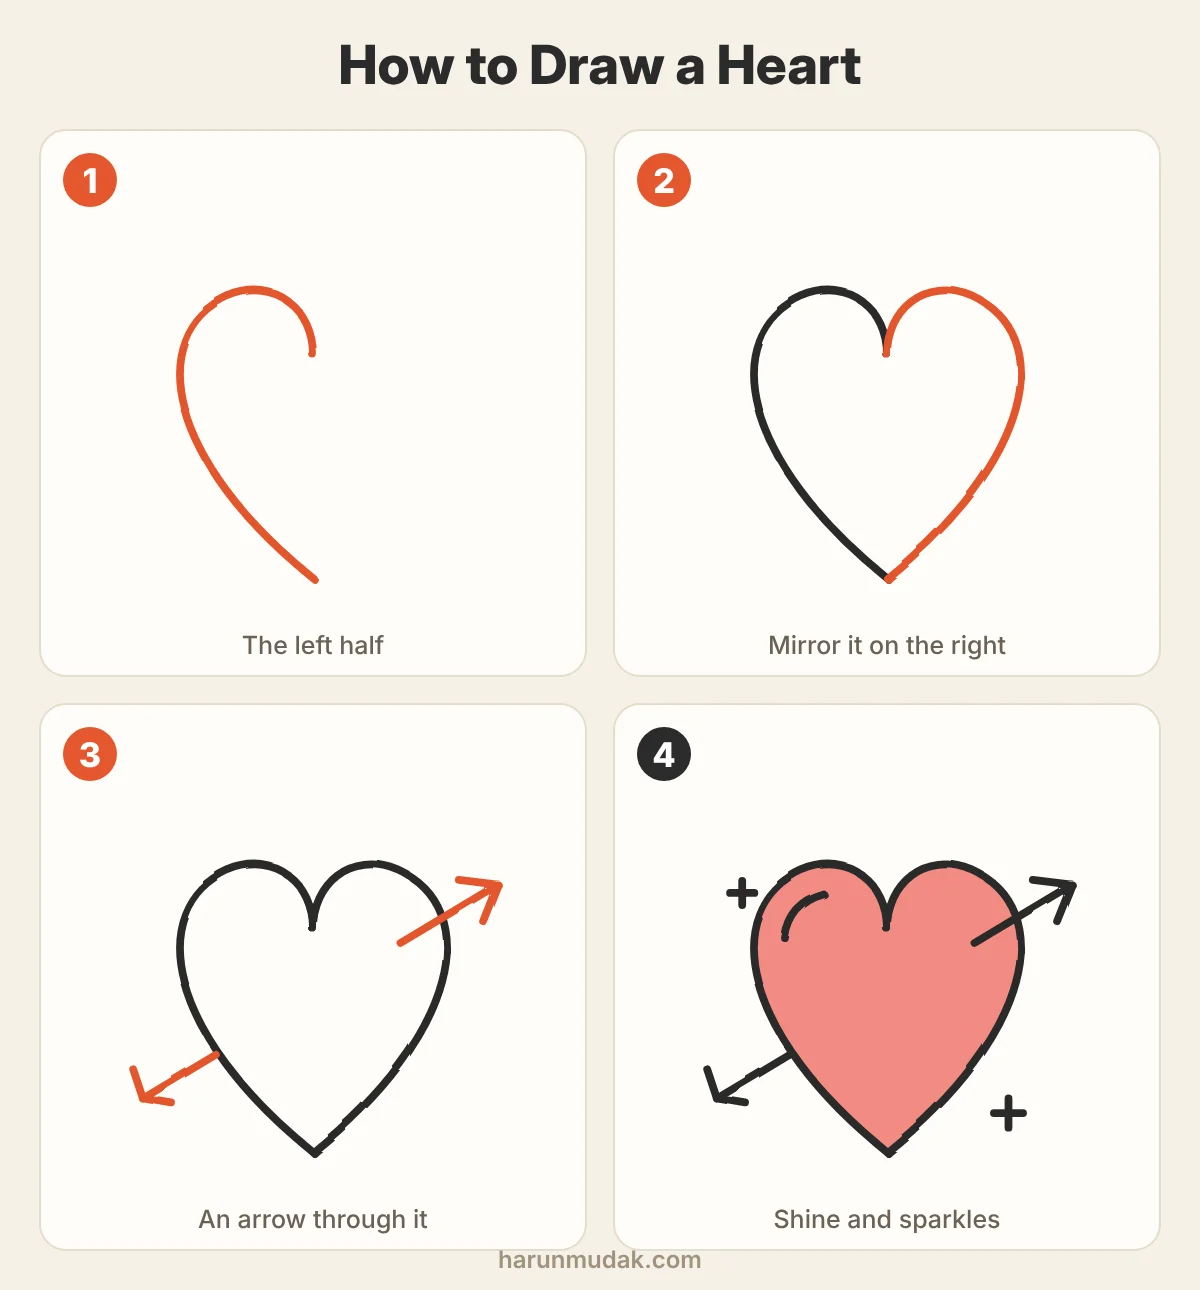
Draw the left half first: start at the dip in the middle, curve up and around, and bring the line down to a point. Then mirror it on the right. If the two halves do not match, turn the paper upside down. The uneven side is easier to see that way. Finish with an arrow and a short curved shine mark.
3. Cherries
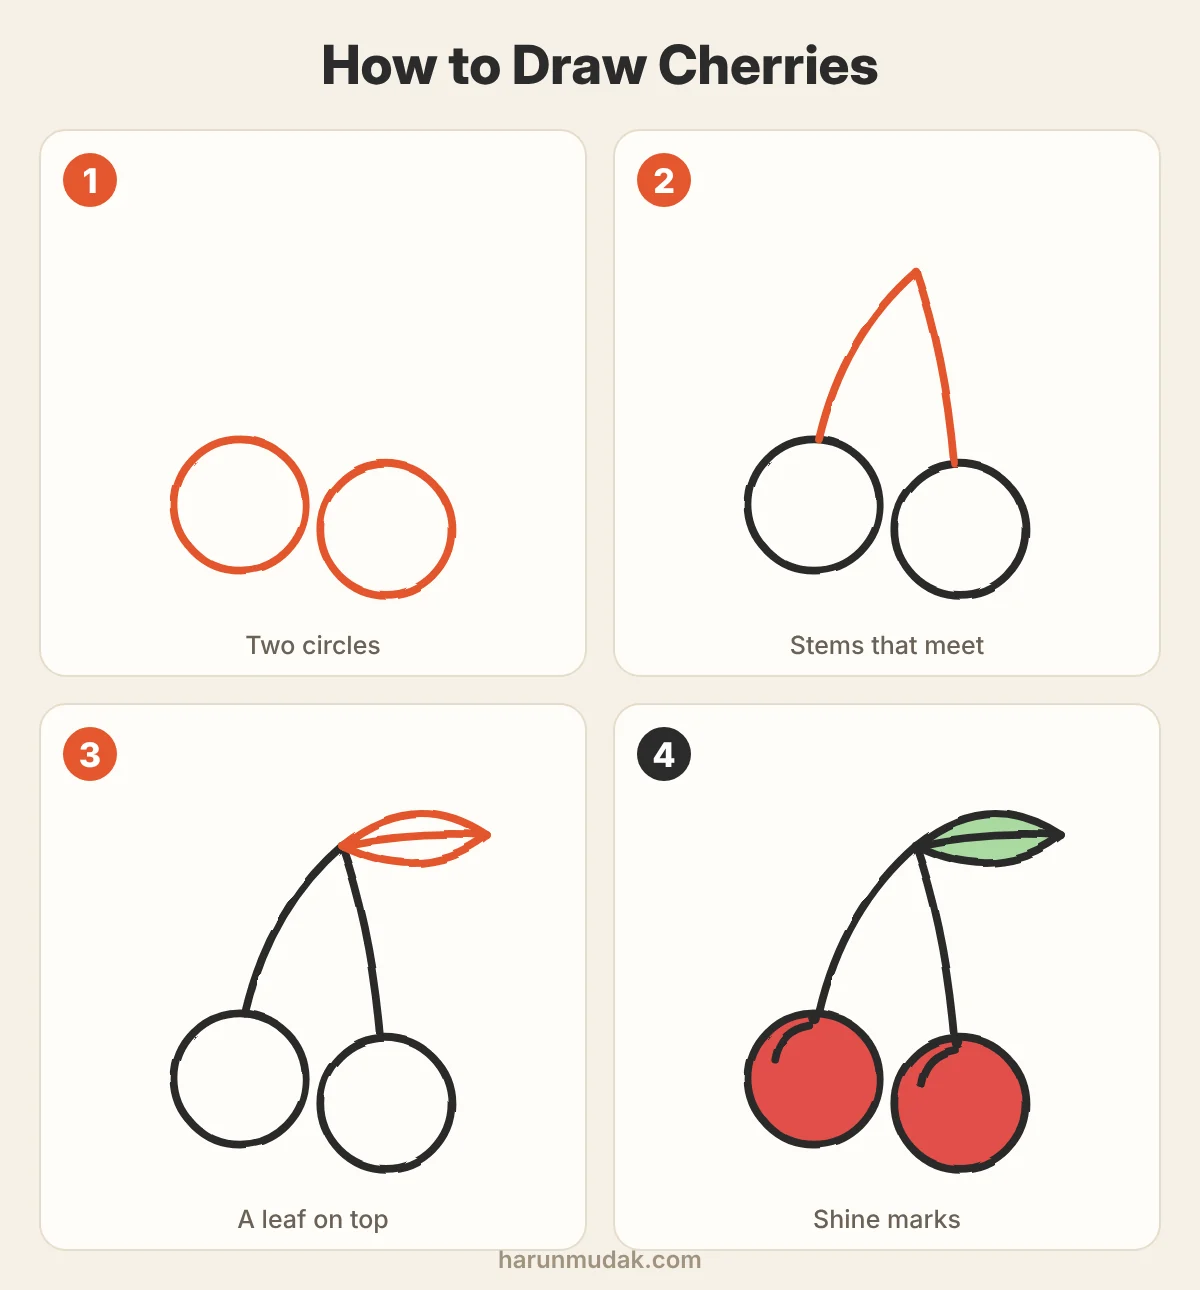
Draw two circles side by side, one a little lower than the other. Give each a curved stem and let the stems meet at the top. Add a leaf where they join and a small curved highlight on each cherry. Leave the highlight white when you color them red.
4. Leaf
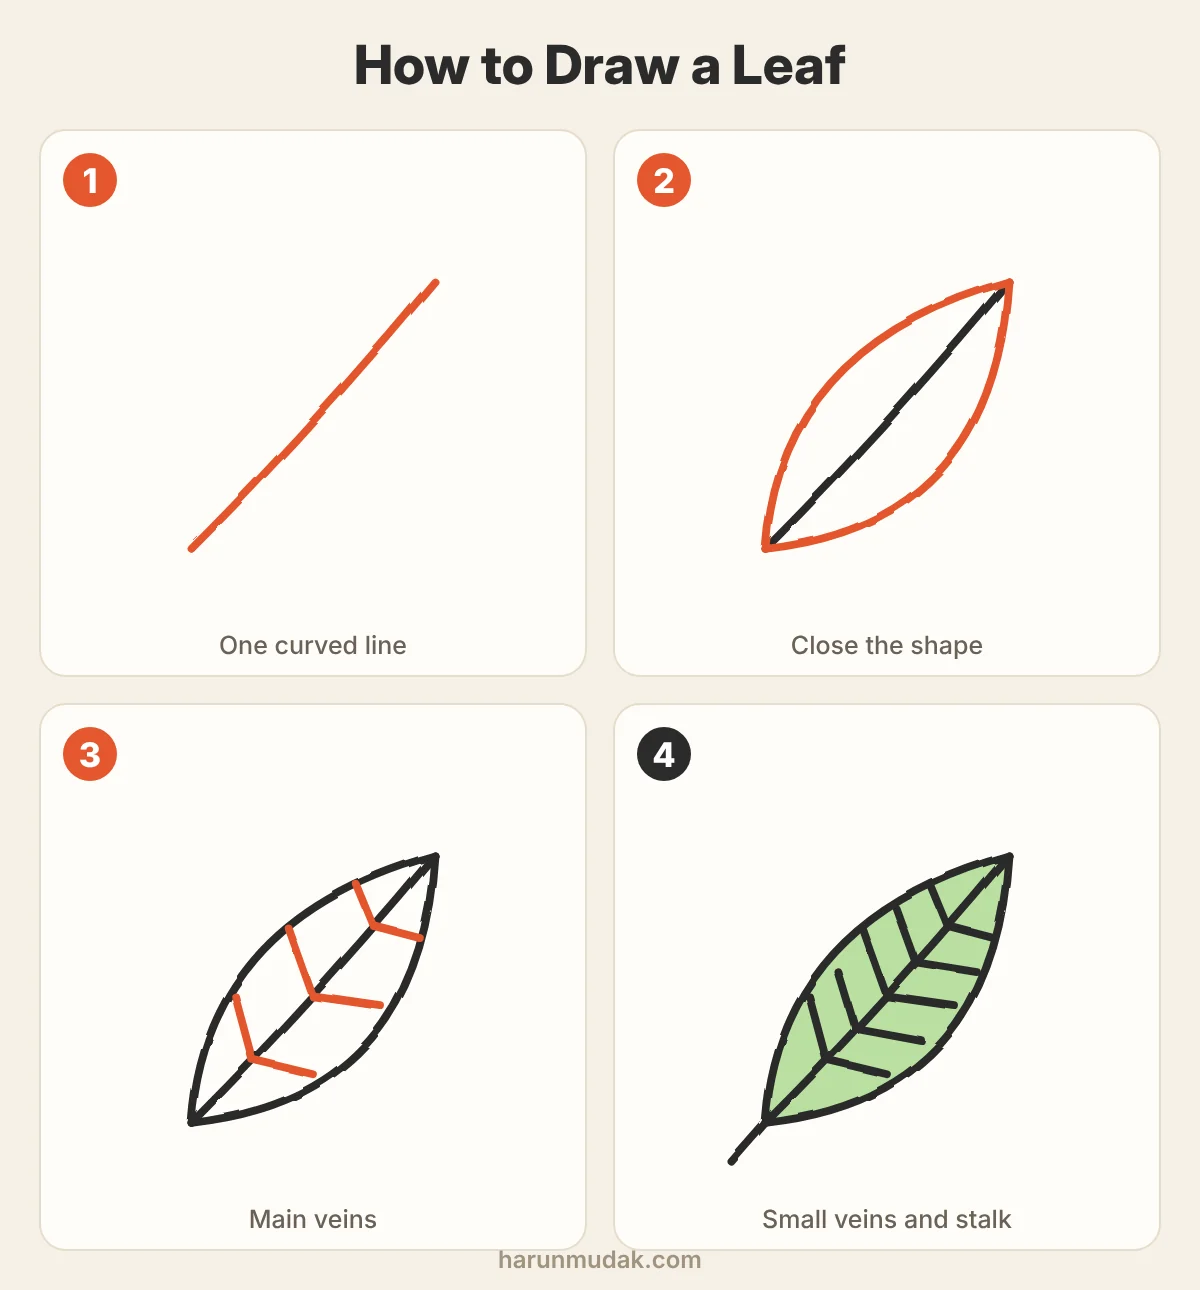
Start with a single curved line. That is the middle vein. Draw one curve from the bottom to the tip on each side to close the leaf. Add veins that branch off the middle line in pairs, all leaning toward the tip, then extend the bottom into a short stalk.
5. Daisy
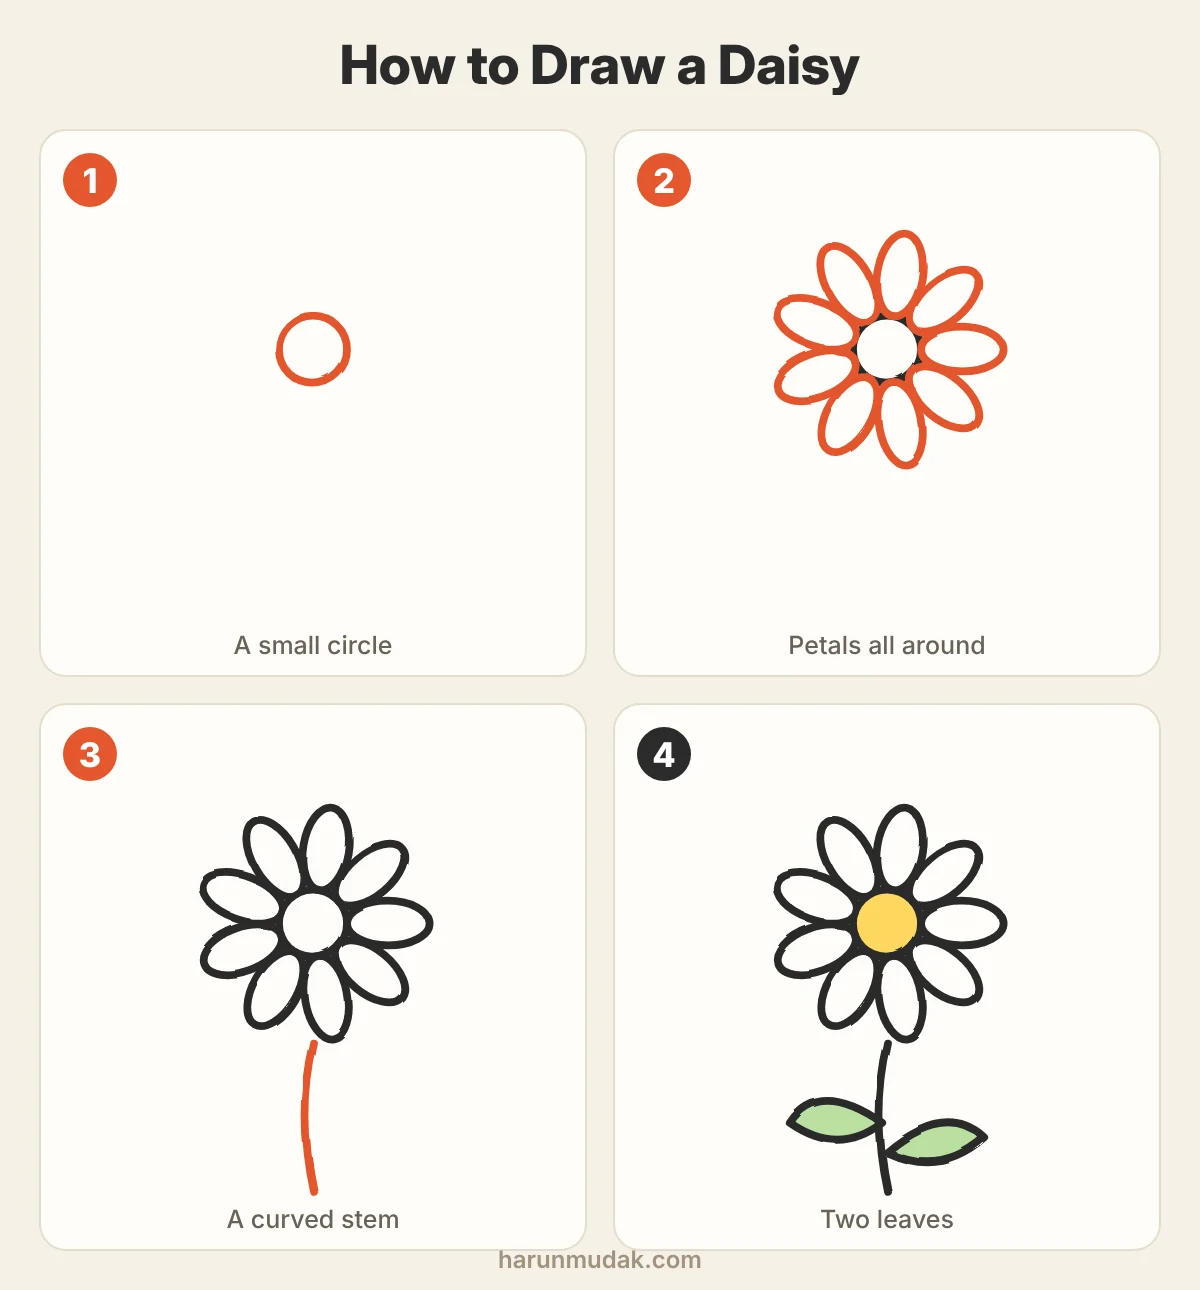
Draw a small circle for the center. Add long, narrow petals all the way around it. Draw the top, bottom, left and right petals first, then fill the gaps, and the spacing takes care of itself. A gently curved stem and two leaves finish it. For more flowers, see how to draw flowers step by step.
6. Mushroom
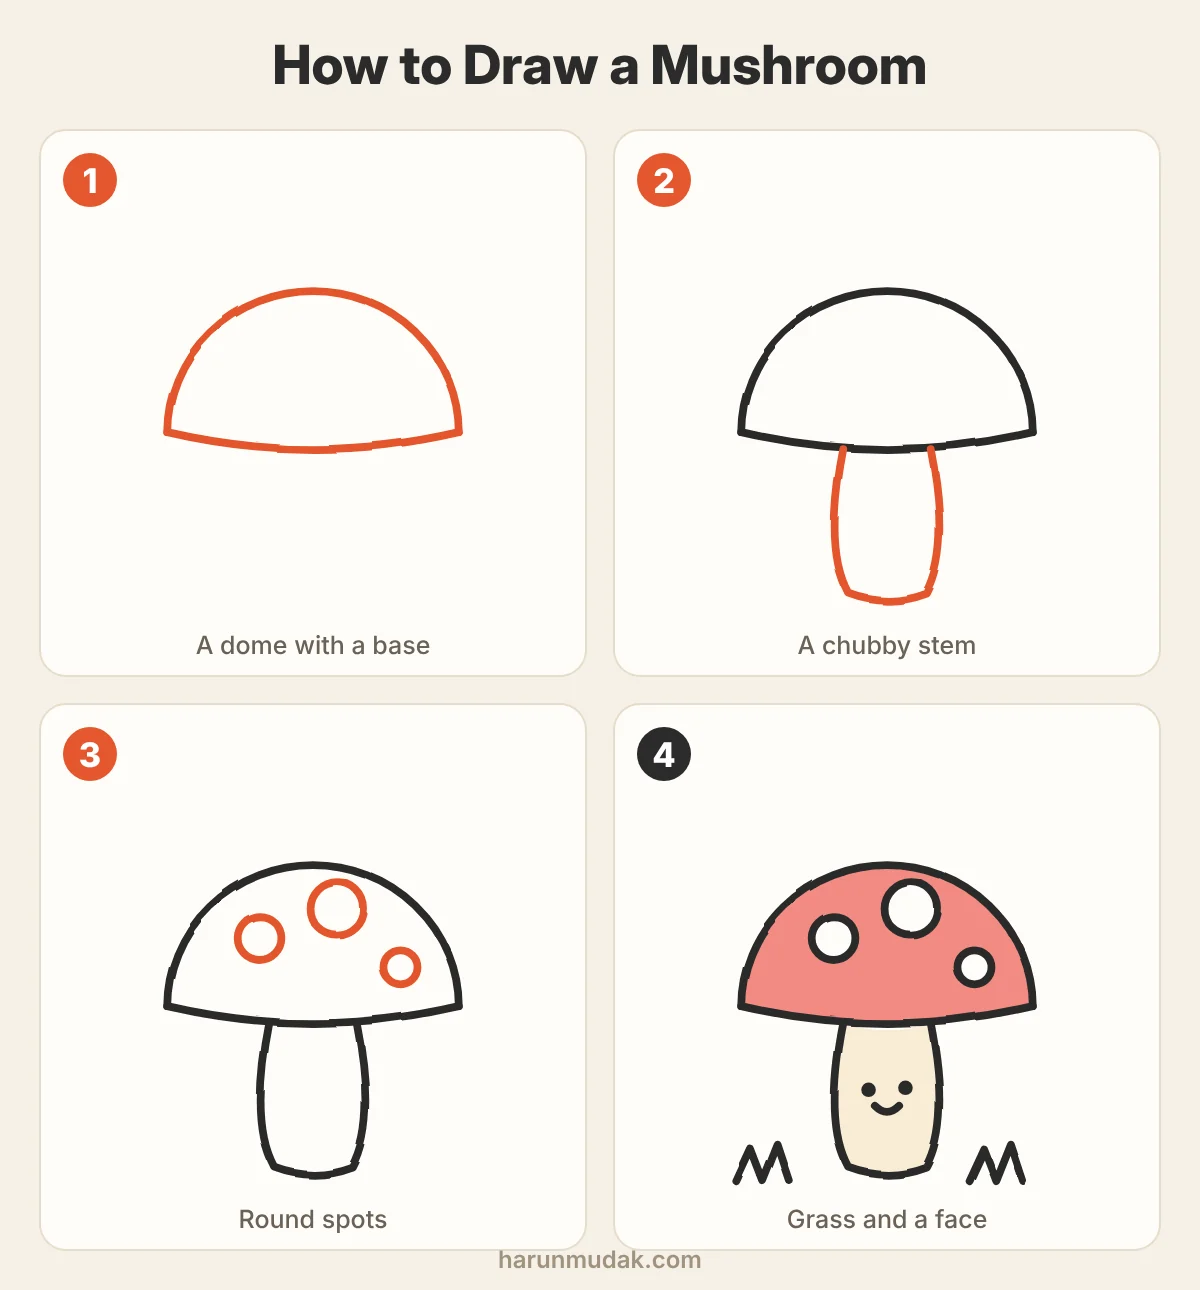
Draw a dome and close it with a slightly curved line underneath. Add a short, chubby stem that is a little wider at the bottom. Put three circles of different sizes on the cap. A tiny face on the stem and two tufts of grass make it a character instead of a diagram.
7. Cactus
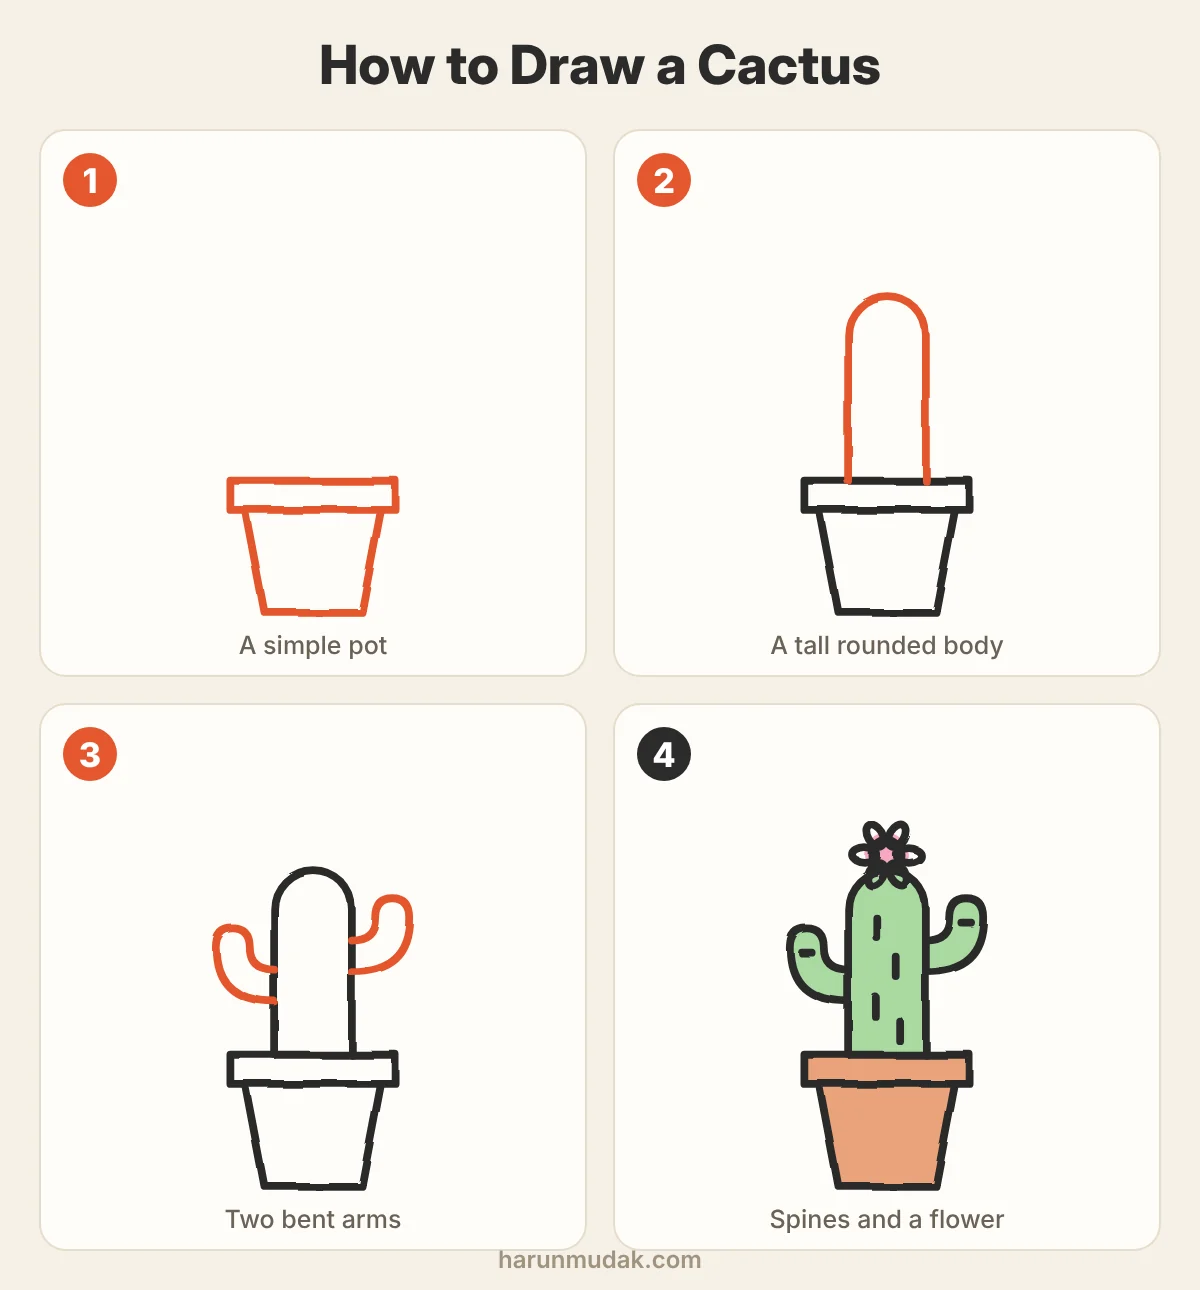
Begin with the pot: a thin rectangle for the rim and a tapered shape below it. Draw a tall body with a rounded top growing out of the pot. Add one bent arm on each side at different heights. Short dashes for spines and a small flower on top complete it.
8. Ice cream cone
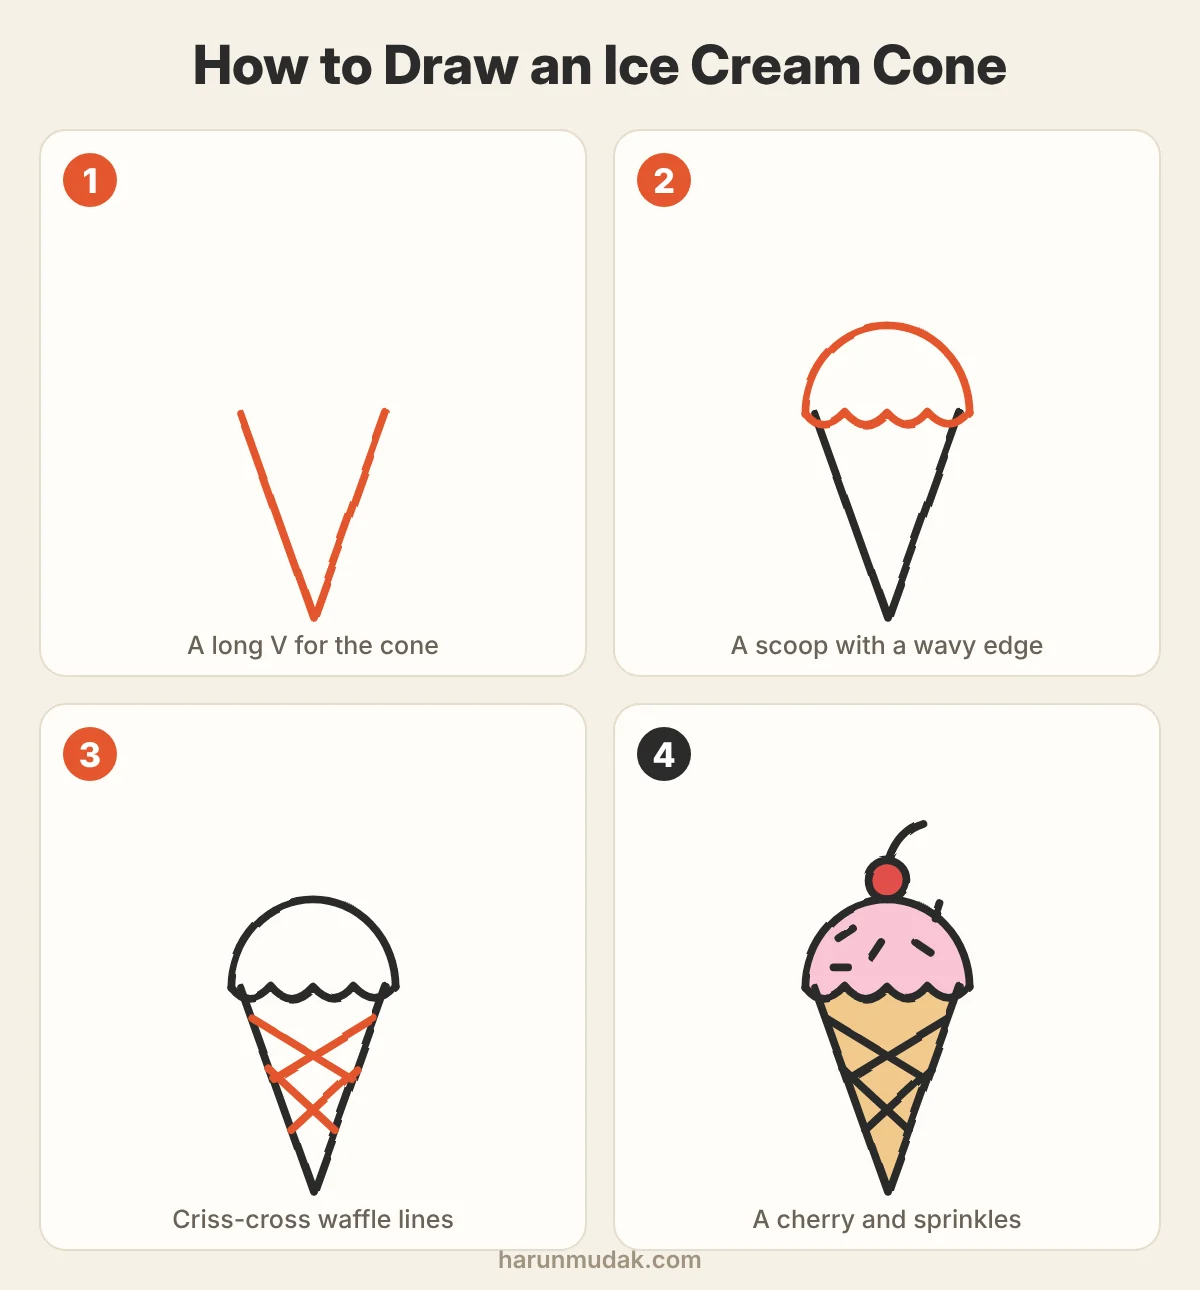
Draw a long V. Sit a half circle on top and give its lower edge a wavy line, as if the ice cream were starting to melt. Cross a few diagonal lines over the cone for the waffle pattern. Top it with a cherry and scatter short dashes for sprinkles.
9. Tree
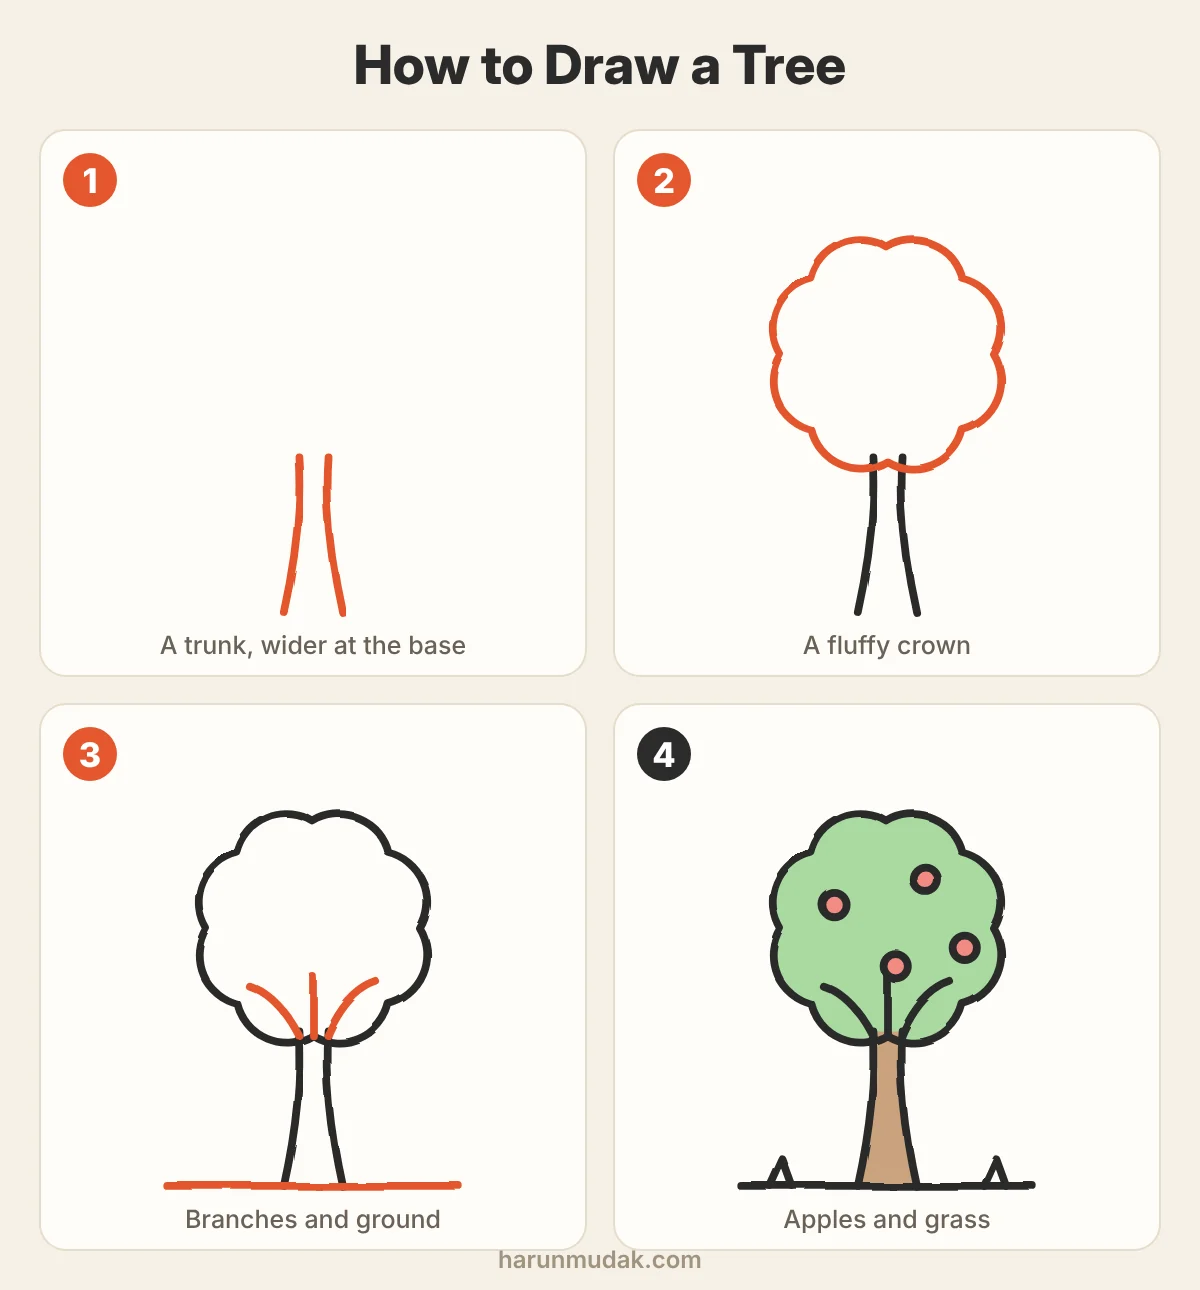
Draw two lines for the trunk, slightly wider apart at the bottom. Draw the crown as a ring of connected bumps, like a cloud. Let two or three branches reach from the trunk into the crown, and add a ground line. A few small circles turn it into an apple tree.
10. Mountains
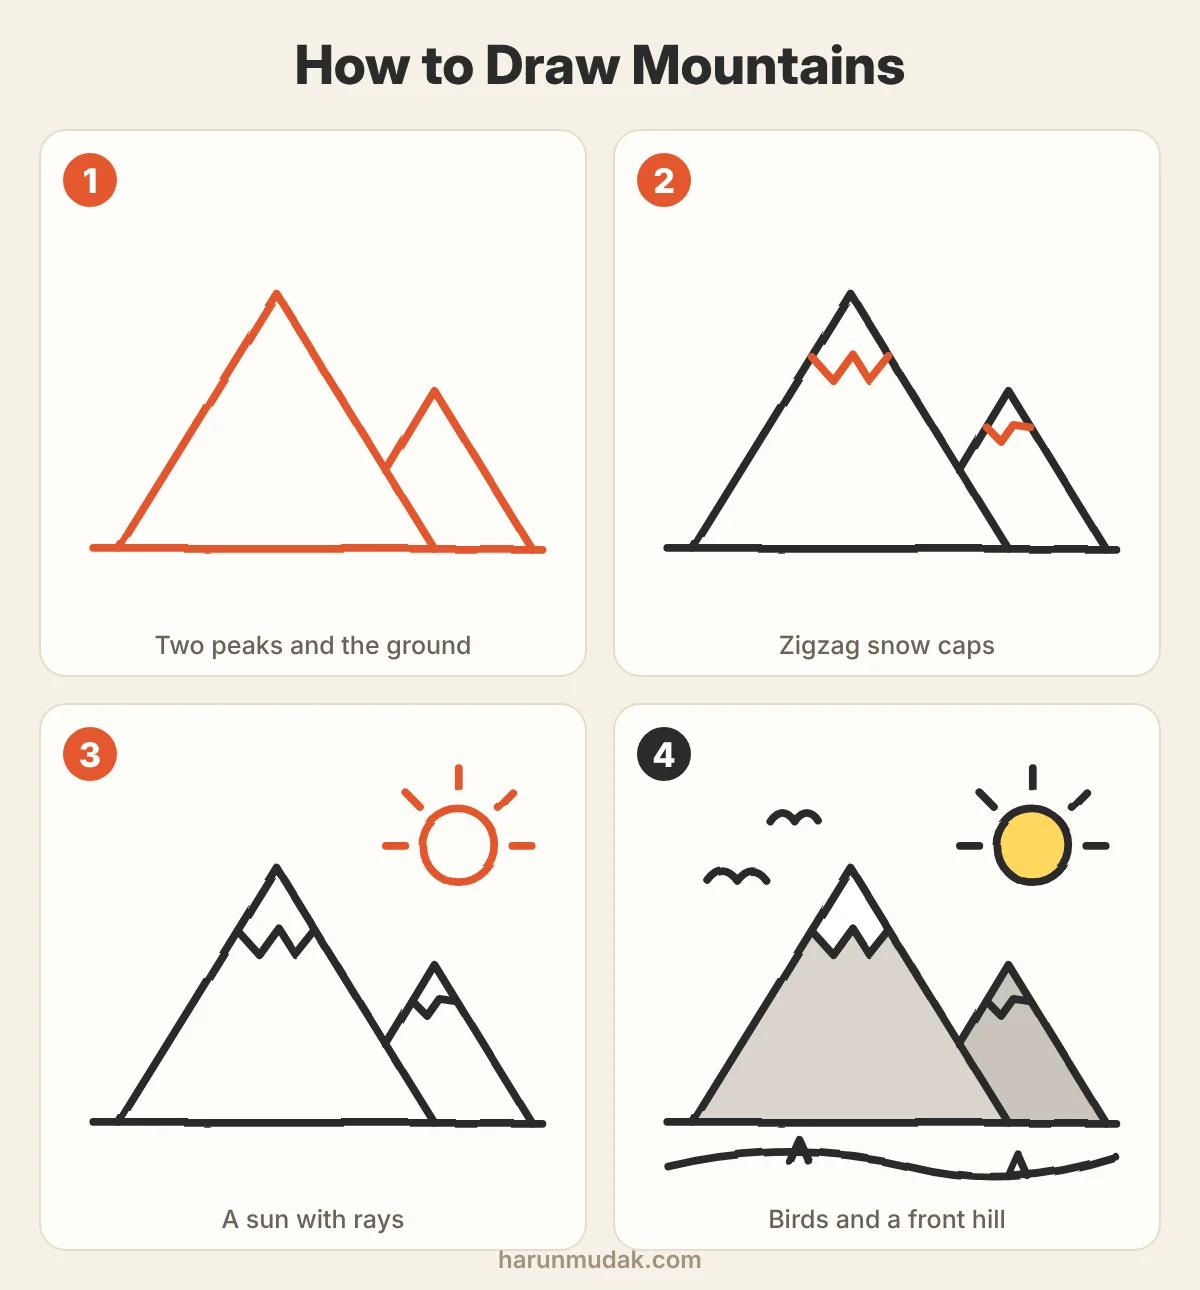
Draw a large triangle without its base, then a smaller one that disappears behind it. A zigzag line near each peak marks the snow. Add a sun with short rays, two birds drawn as flattened letter M shapes, and a rolling line in front for a hill. This is a whole landscape in under twenty lines.
11. 3D cube
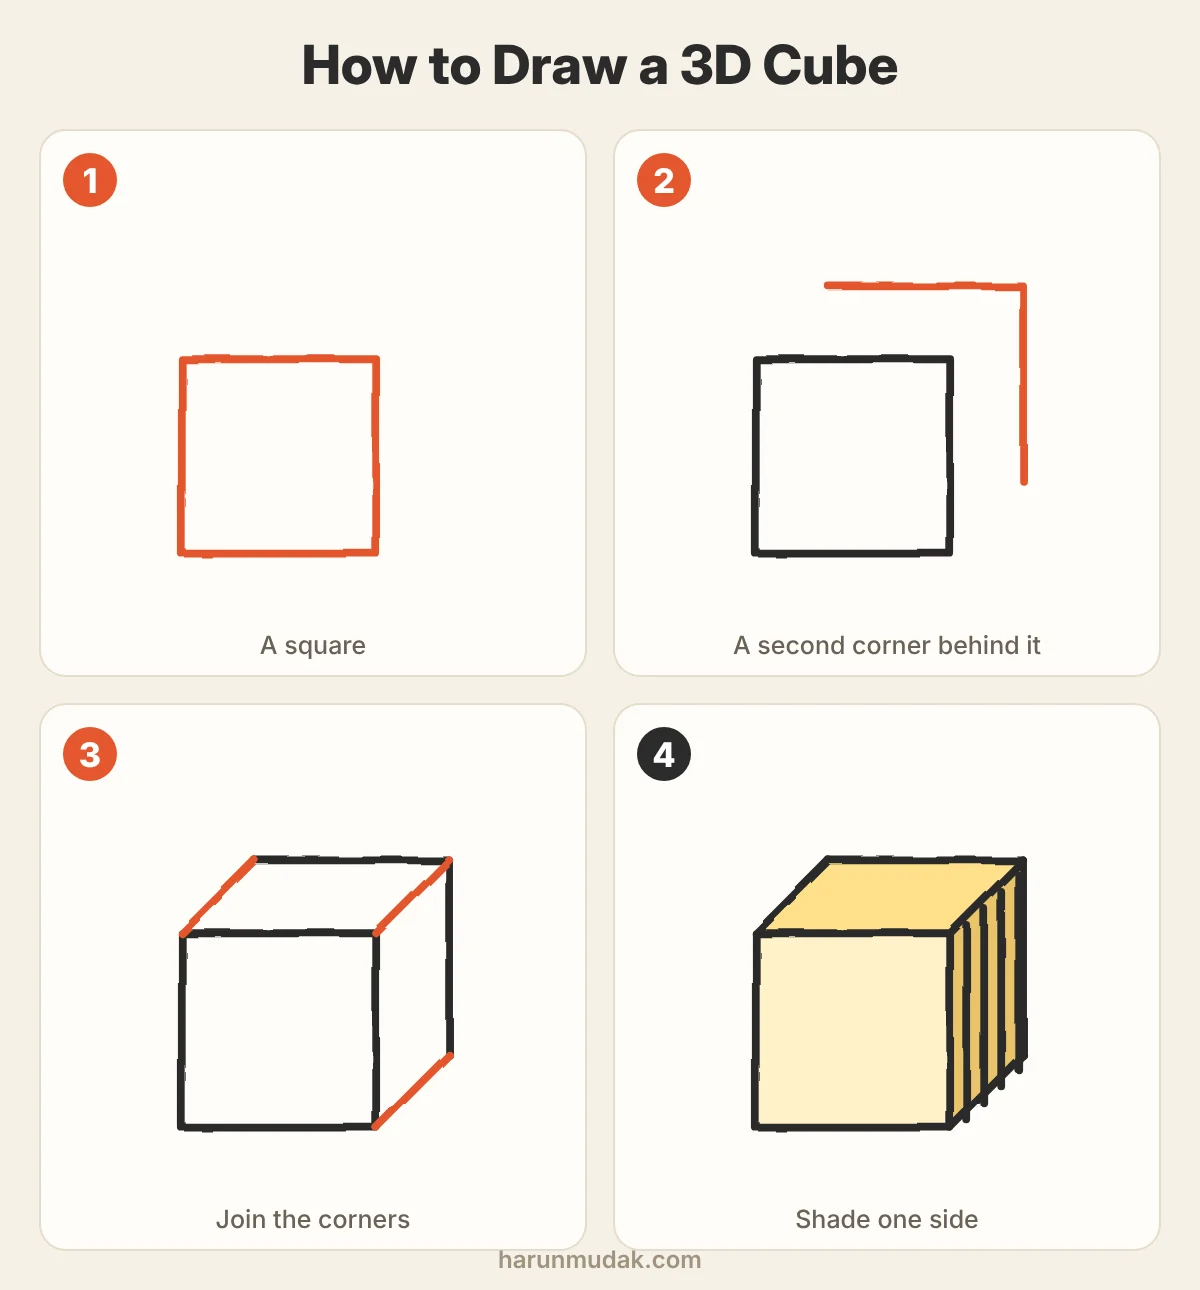
Draw a square. Draw the top and right edges of a second square, shifted up and to the right. Join the three matching corners with short diagonal lines. Shade the side face with evenly spaced lines. Shading only one face is what makes the cube look solid.
12. Fish
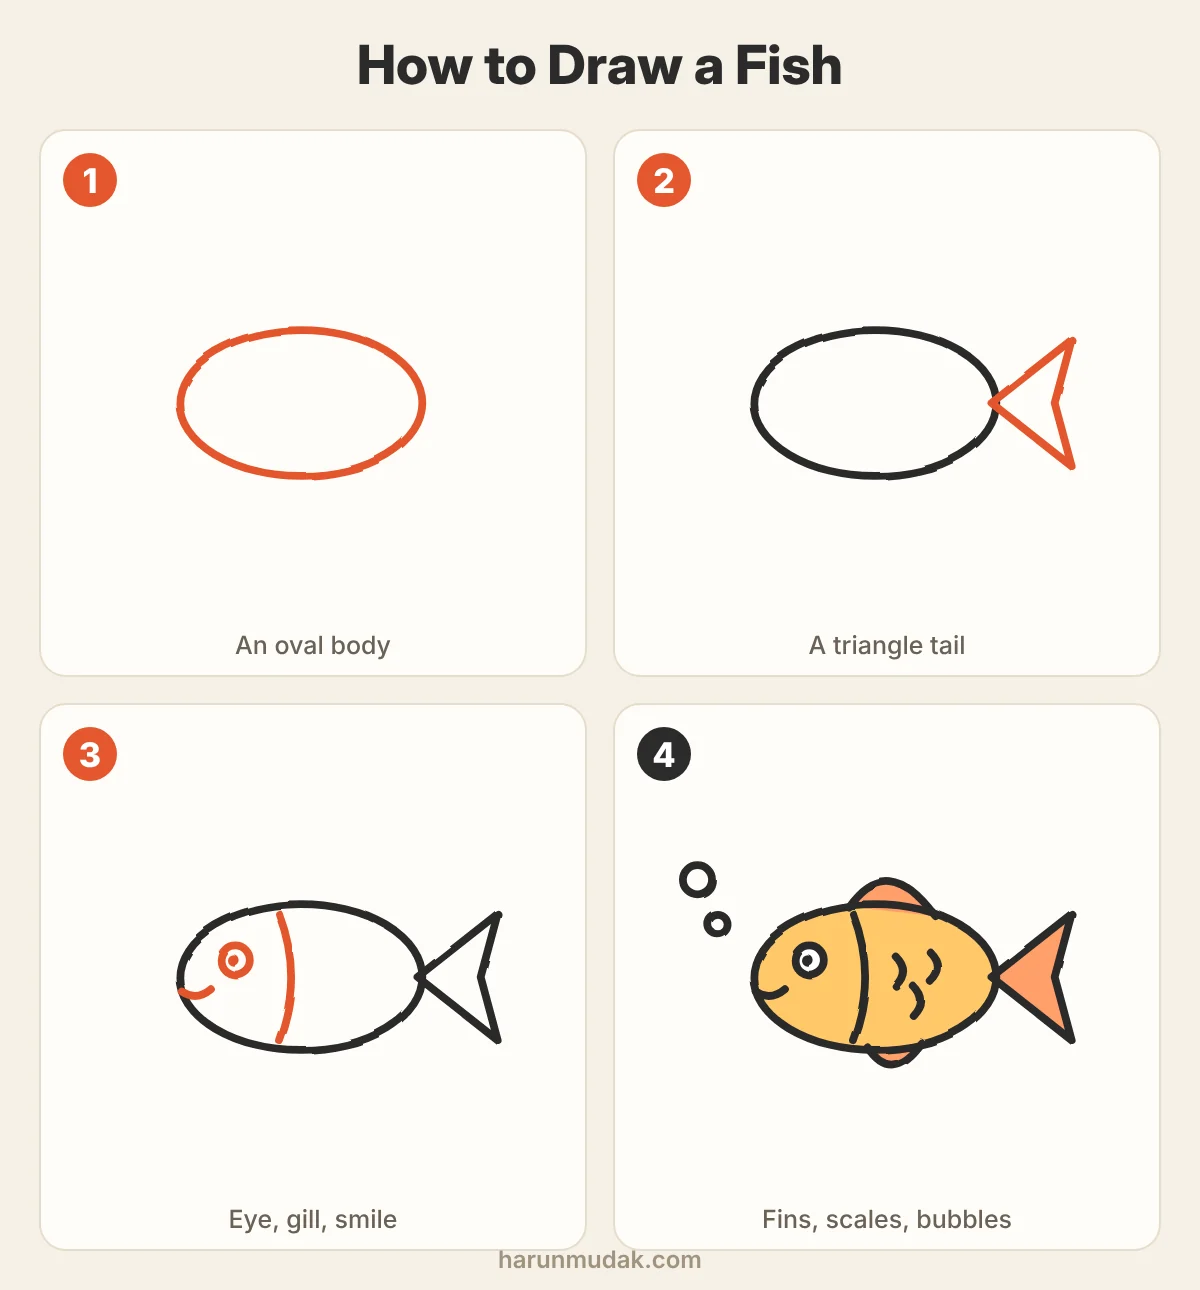
Draw an oval for the body and a triangle for the tail, with a notch cut into its back edge. Add a round eye, a curved line for the gill and a small smile. Finish with a fin on top, a smaller one below, a few curved scales and two bubbles.
13. Cat face
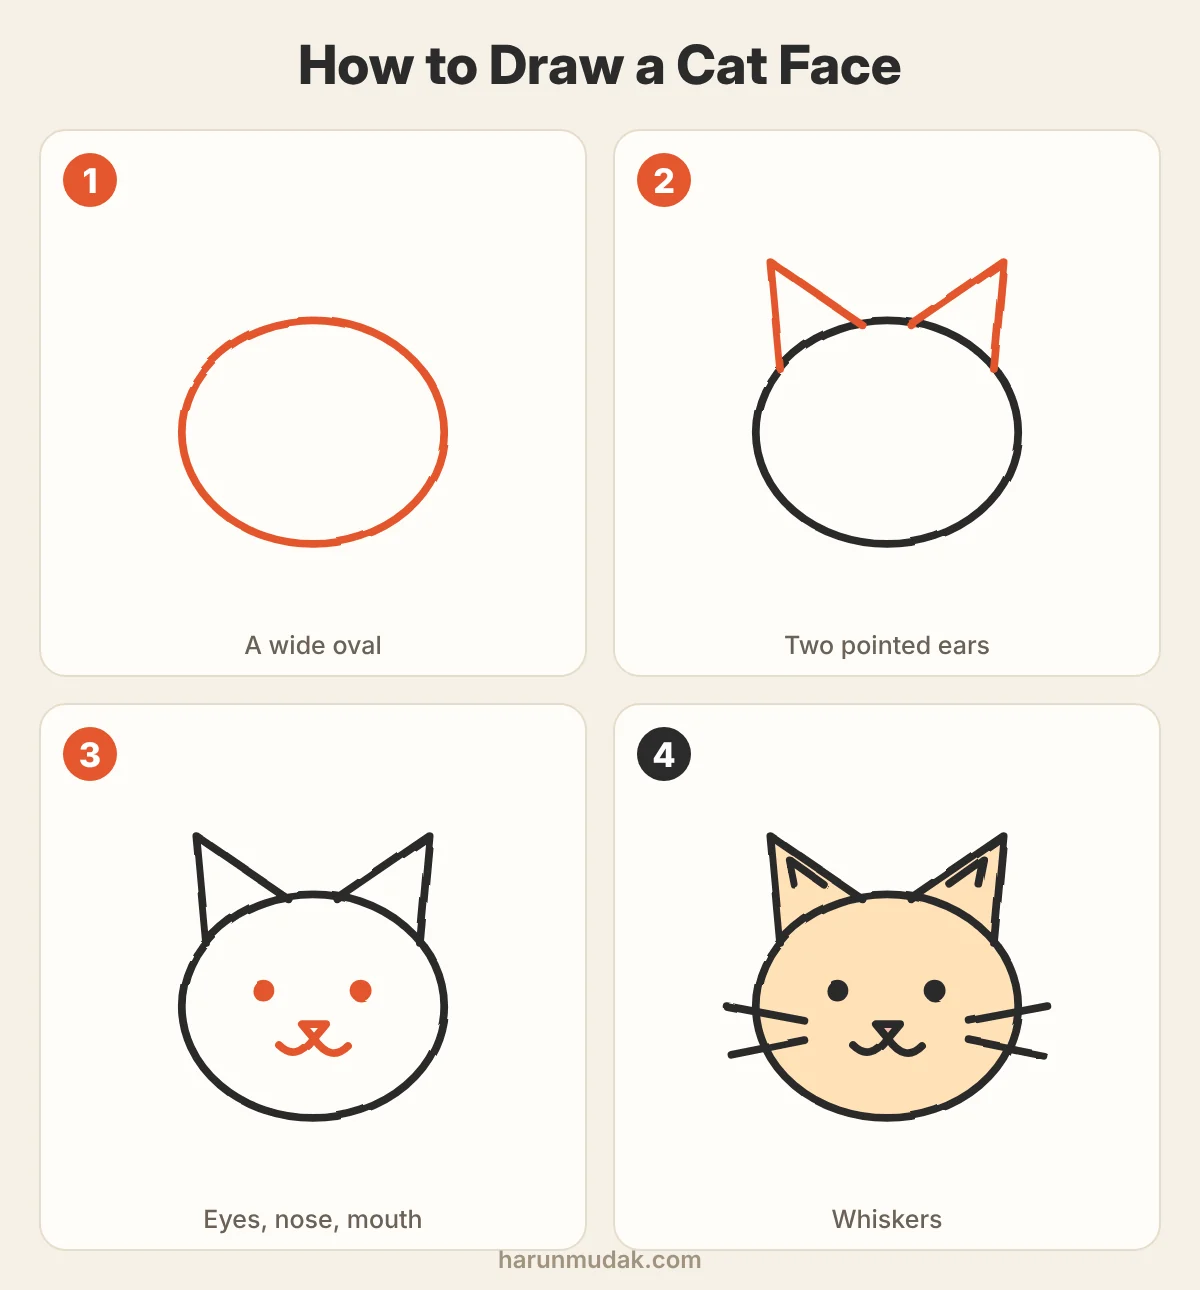
Draw a wide oval. Add two triangles for ears, tilted slightly outward. Place the eyes halfway down the face. Beginners tend to put them too high. The nose is a small upside-down triangle, and the mouth is two short curves hanging from it. Finish with two or three whiskers on each side. More animals: how to draw cute animals.
14. Bird
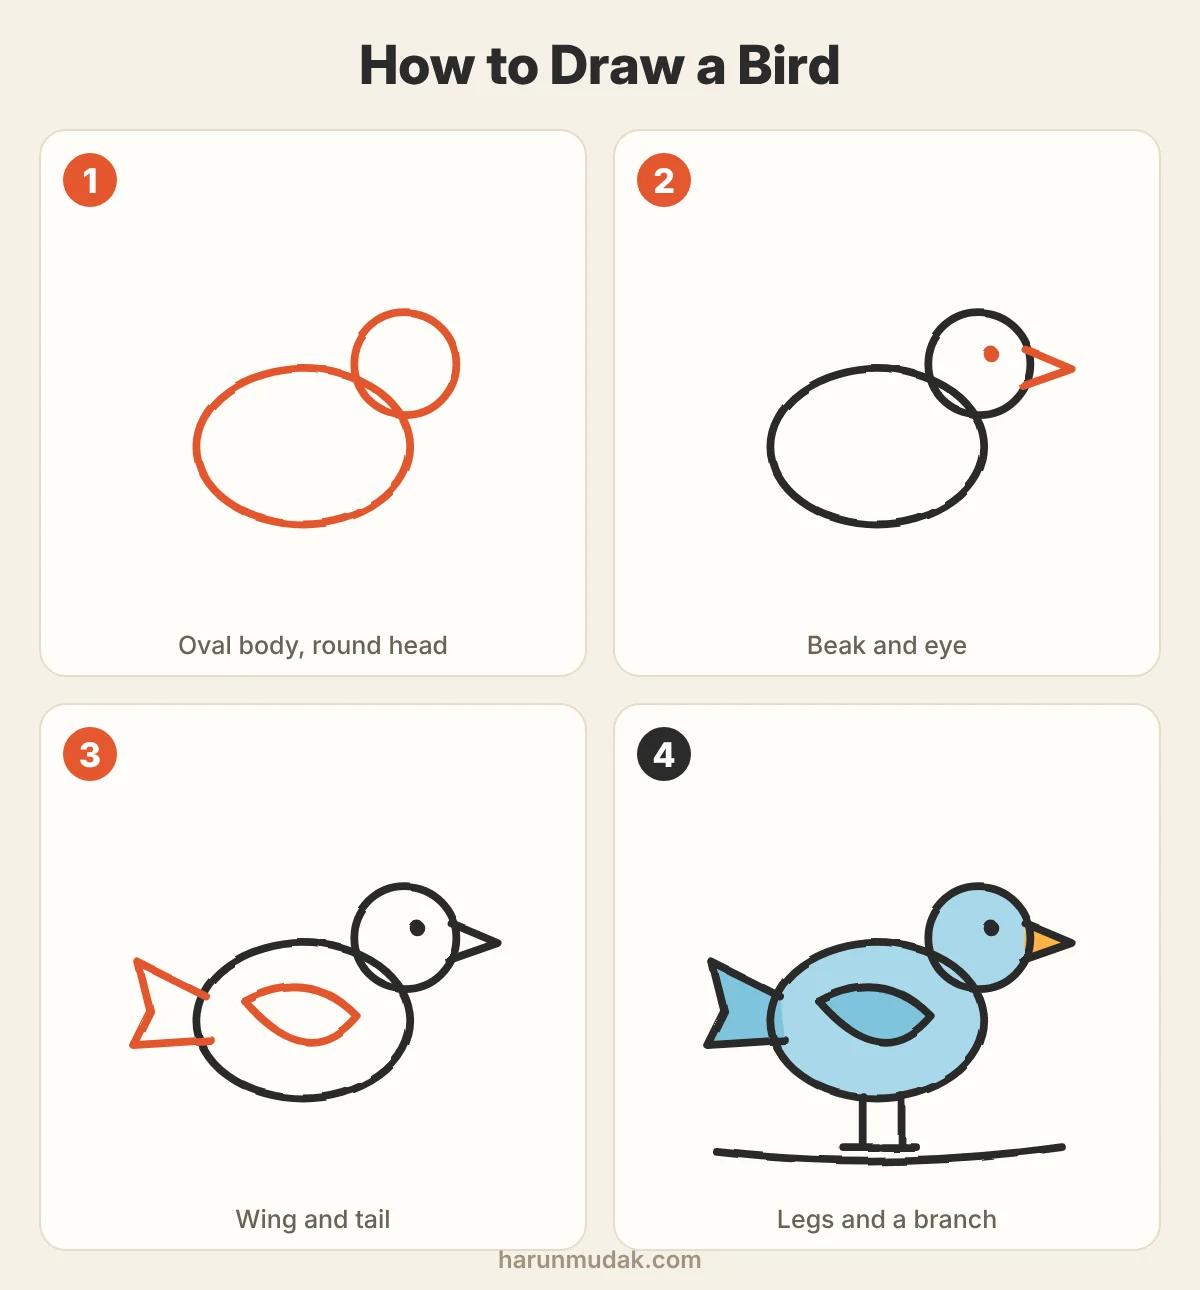
Draw an oval for the body and a circle for the head, overlapping at one end. Add a triangle beak and a dot for the eye. A leaf-shaped wing goes in the middle of the body, and a few straight lines make the tail. Two short legs and a branch give the bird somewhere to stand.
15. Butterfly
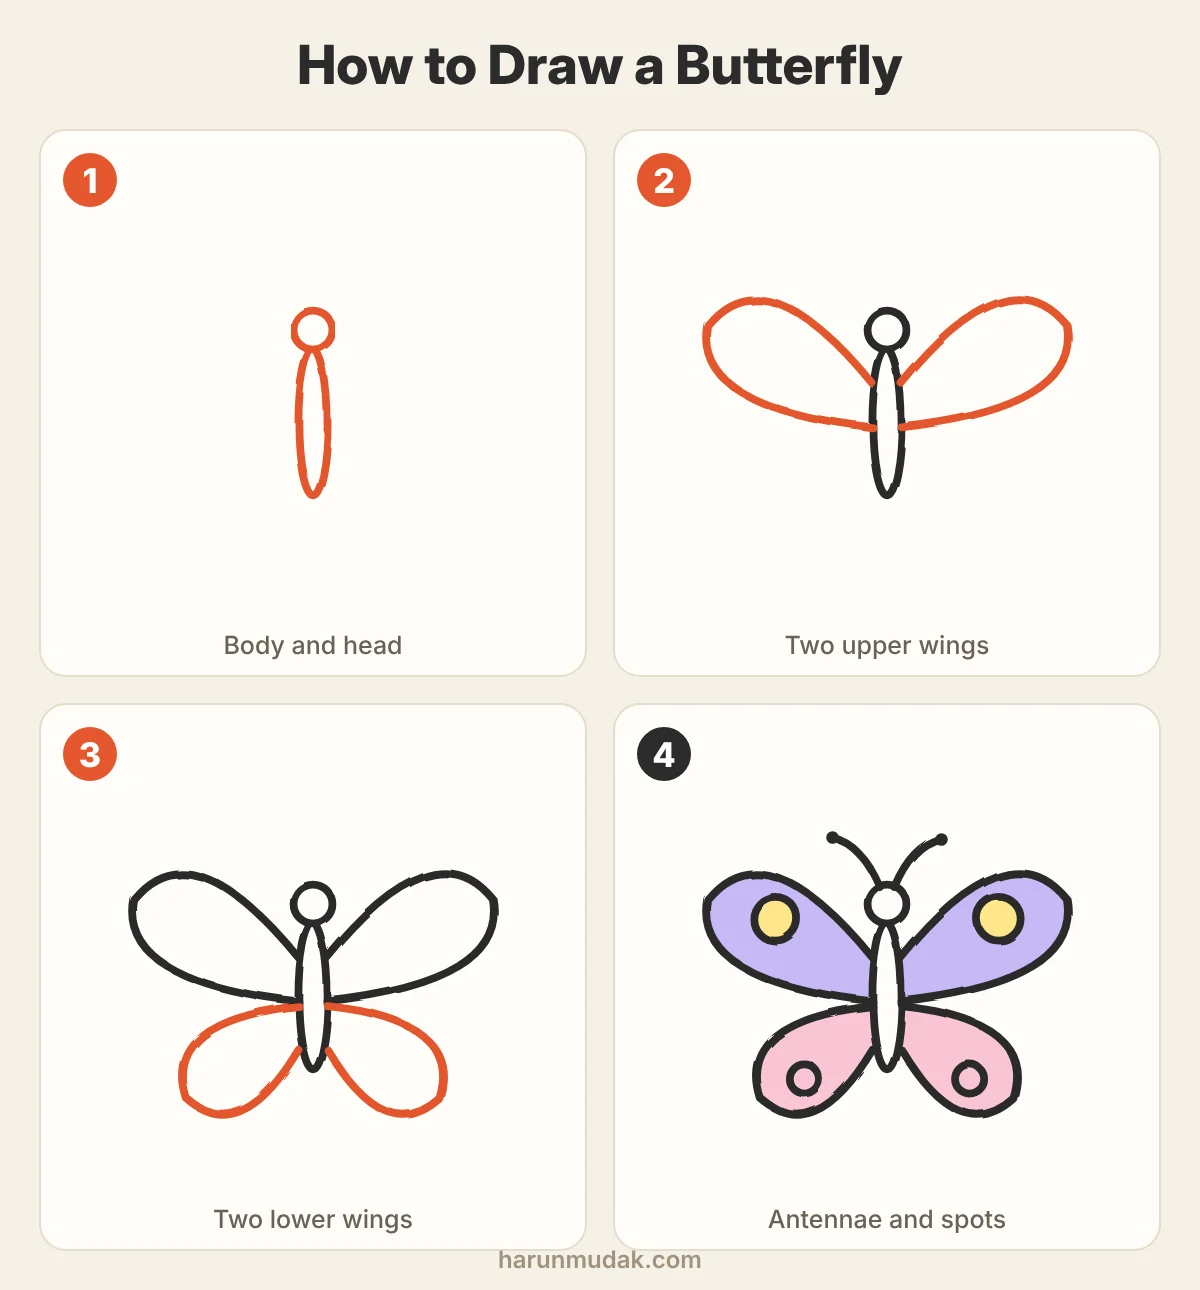
Draw a thin oval for the body and a small circle for the head. Add the two large upper wings first, then the two smaller lower wings. Draw one side, then copy it on the other, checking the height of each wing tip as you go. Curved antennae and a circle on each wing finish it.
16. Whale
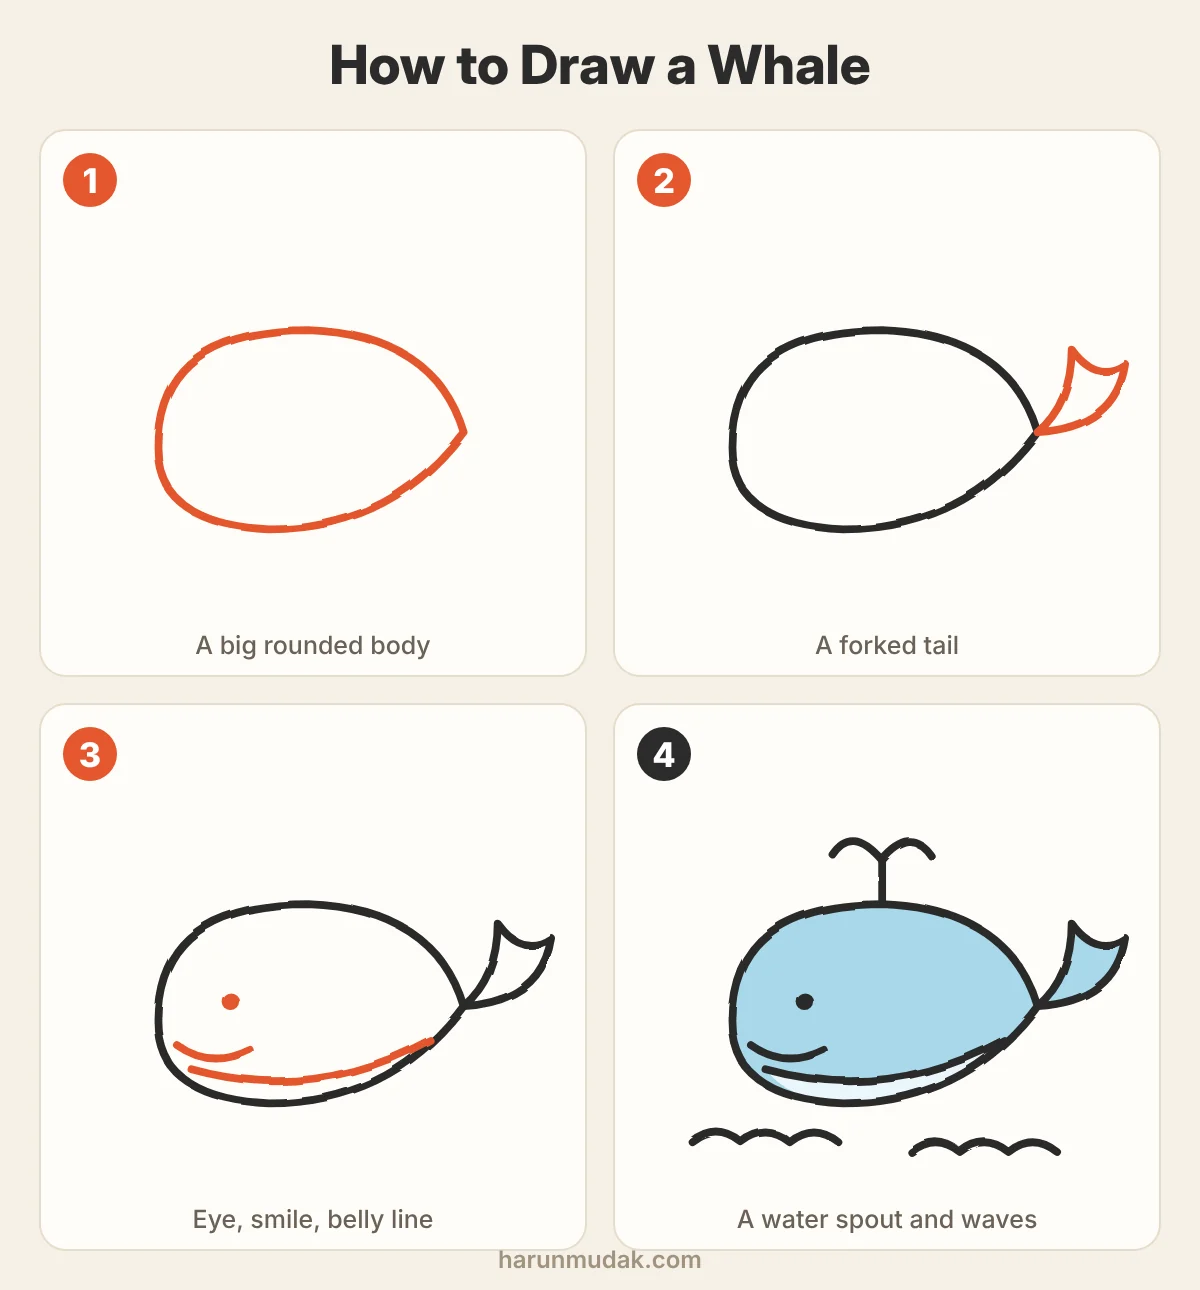
Draw a large rounded body that narrows toward the back. Add a forked tail pointing up. Place a small eye low on the head, with a smile below it and a long curve for the belly. A water spout on top and a few wavy lines underneath put the whale in the sea.
40 more easy things to draw
Once the sixteen drawings above feel comfortable, the same approach works for almost anything: find the biggest simple shape, draw it, then add the parts that stick out. Here are forty subjects that break down easily.
- Nature: a tulip, a sunflower, a pine tree, a crescent moon, a star, a raindrop, a snowflake, a wave, a rainbow, an acorn
- Food: an apple, a pear, a slice of watermelon, a strawberry, a donut, a cupcake, a slice of pizza, a lollipop, a mug of tea, a fried egg
- Animals: a snail, a ladybug, a bee, a jellyfish, a turtle, an owl, a penguin, a bunny, a hedgehog, a goldfish in a bowl
- Objects: a hot-air balloon, a paper plane, a sailboat, an umbrella, a lightbulb, a house, a kite, a key, a candle, a potted plant
Looking for a different kind of practice? Try these easy sketches for beginners, learn how to draw an eye step by step, or browse things to draw when you are bored.
Five habits that help beginners improve
- Draw a little every day. Ten minutes daily teaches your hand more than one long session a week.
- Start with the biggest shape. Get the overall size and position right before adding any detail. Details cannot rescue a shape that is in the wrong place.
- Move your whole arm. Long lines and circles come out smoother when the movement starts at the elbow or shoulder, not the fingers.
- Repeat the same drawing. Draw one subject five times in a row. The fifth version is almost always better than the first, and you can see why.
- Keep your old drawings. Date them and put them in a folder. Looking back after a month is the clearest proof that practice works.
Questions beginners ask
What should a beginner draw first?
Simple objects made of one or two shapes: a cloud, a heart, cherries, a leaf. They are quick, they are hard to get badly wrong, and each one practices a basic skill such as curves, symmetry or circles.
Which pencil is best for beginners?
An HB or 2B pencil. HB gives a lighter line that is easy to erase; 2B is a little darker and softer. You do not need a full set of pencil grades to start.
How long does it take to get good at drawing?
With short daily practice, most people see a clear difference within a few weeks: steadier lines, better proportions and more confidence. Drawing is a skill built by repetition, not a talent you either have or lack.
Can I trace the drawings to practice?
Yes. Tracing trains your hand to make smooth lines and helps you see how a drawing is put together. Trace it once, then draw it again without tracing.
When these feel easy, move on to more drawing tutorials and ideas.




3 comments
I like this article.
Cute, Cute, & Cute!!!!! I really liked all of them 🙂 🙂 🙂 ………………… Lovely
I like your drawings